Media How-to
How to Resize Multiple Images at Once on Windows
Resize multiple images at once on Windows 11 and 10: batch resize hundreds of photos in seconds with a free app or PowerToys, and pick the right size.
On this page
Windows has no built-in way to resize many images at once; Photos and Paint work one picture at a time. To resize multiple images at once, use a free batch resizer such as Image Resizer App: add the photos, set a width or a percentage, keep the aspect ratio locked, and export them all in one click. Microsoft PowerToys also adds a right-click Resize option.
Time: 2 minutes · Cost: free · Works on: Windows 11 and Windows 10
Phone photos are often 4,000 pixels wide and 3–8 MB each. That is too big for email, website uploads, online shops and forms with size limits. Resizing them one by one in Paint takes forever. This guide shows how to resize multiple images at once on Windows, which size to choose, and how to keep them sharp.
What You Need
- A folder of photos or screenshots.
- A batch resizer: Image Resizer App (Microsoft Store) or Microsoft PowerToys.
- The target size, for example 1920 pixels wide or 50 percent. See the table below.
Method 1: Image Resizer App
-
Install and open the app
Get Image Resizer App from the Microsoft Store. It is free and works offline.
-
Add your images
Choose batch resize and add the photos, or a whole folder. Hundreds of images in one batch are fine.
-
Set the size
Enter an exact width and height, or scale by percentage. Keep the aspect ratio locked so photos are not stretched.
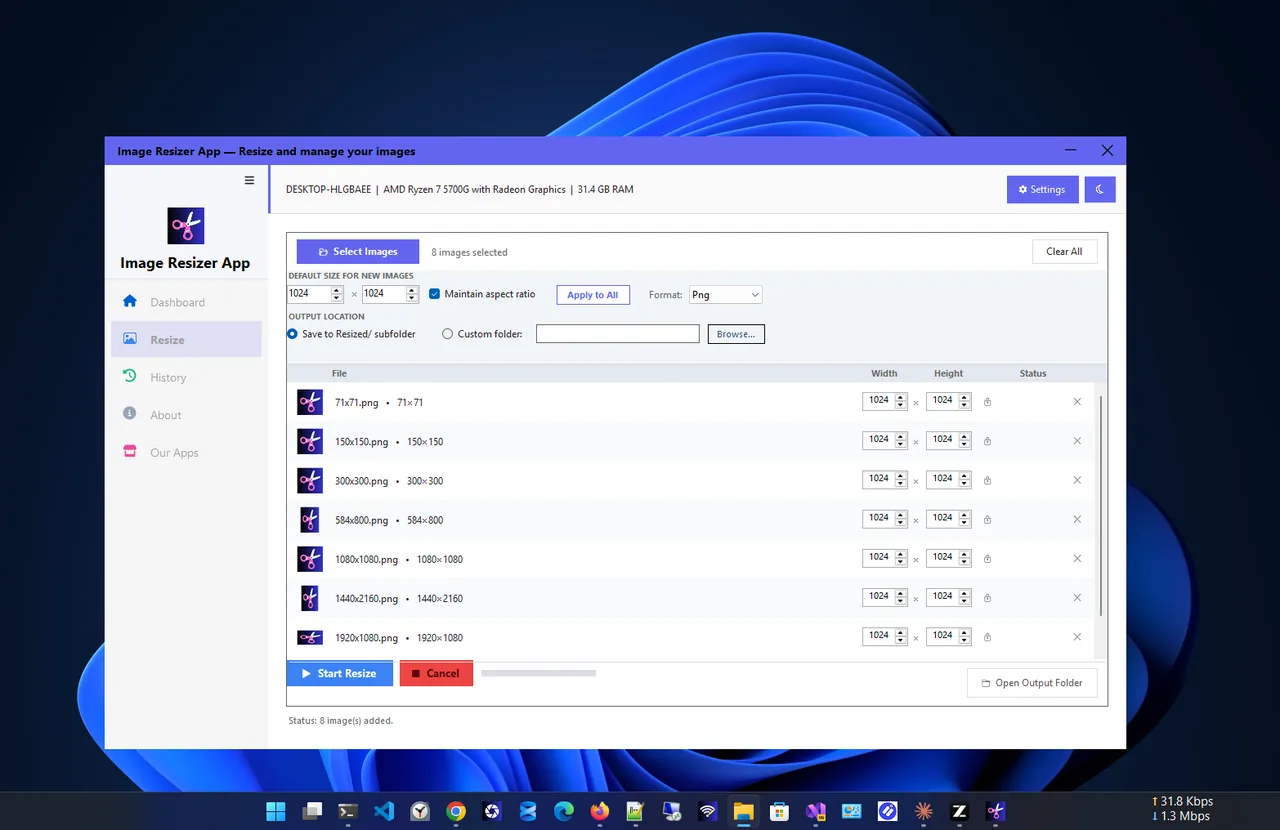
Batch resize: add images, choose a size and export. -
Export
Choose where to save the resized copies and start. Your originals are not changed. The history page lists every batch with sizes and formats.
Method 2: PowerToys Image Resizer
-
Install PowerToys
Install Microsoft PowerToys from the Microsoft Store and make sure Image Resizer is turned on in its settings.
-
Select the images
In File Explorer, select the photos (Ctrl + A for the whole folder), right-click and choose Resize with Image Resizer. On some Windows 11 builds it is under Show more options.
-
Pick a preset
Choose Small, Medium, Large or Phone, or enter a custom size, then select Resize. Copies are saved next to the originals.
Resizing Just One Image?
Open it in the Photos app, select the three dots, then Resize image; or open it in Paint and choose Resize (Ctrl + W). Both are fine for a single picture but slow for more than a few.
Which Size Should You Choose?
| Use | Long side | Typical file size |
|---|---|---|
| Email and messaging | 1280–1600 px | 200–500 KB |
| Website and blog images | 1200–1920 px | 100–400 KB |
| Online shop product photos | 1500–2000 px (square) | 200–600 KB |
| Social media posts | 1080–2048 px | Platform recompresses |
| Forms with a size limit | 800–1200 px | Under 200 KB |
| Printing (A4 / 8×10 in) | 2400–3500 px | Keep the original if you can |
Halving the width and height cuts the pixel count, and usually the file size, to about a quarter.
Pixels, DPI and File Size: What Actually Matters
Three numbers get mixed up. Pixels (for example 1920 × 1080) are the real size of the image and decide how sharp it looks on screen. File size (KB or MB) depends on the pixels, the format and the compression level. DPI only matters for printing: it tells the printer how many pixels to place per inch, and changing it alone does not make the file smaller. So when a website or form asks for a smaller image, reduce the pixels; when a printer asks for 300 DPI, make sure there are enough pixels for the print size.
Tips for Sharp Results
- Only make images smaller. Enlarging a small photo cannot add detail; it just looks soft.
- Keep the aspect ratio unless you need an exact shape, then crop first.
- Choose the right format: JPEG for photos, PNG for screenshots and graphics with text, WebP for websites.
- Keep your originals. Save resized copies to a new folder.
- Editing video too? See how to remove background noise from video.
- Making a PDF from photos? Resize first, then see how to compress a PDF without losing quality.
- Short on space? Resized archives of old photos, plus removing duplicates, frees a lot: see how to free up disk space.
FAQ
Can Windows 11 resize multiple images without an app?
Not really. Photos and Paint resize one image at a time. Free tools such as Image Resizer App or PowerToys handle batches.
Does resizing reduce image quality?
Making an image smaller removes pixels you would not see at that size, so it looks just as sharp on screen. Enlarging reduces quality.
How do I resize images to a specific file size, like 100 KB?
Reduce the dimensions first (for example 1000 px wide), then save as JPEG. Repeat with a smaller width until the file is under the limit.
Will the originals be overwritten?
Not with the methods above. Both save new copies by default. Check the output folder setting before you start.
Conclusion
To resize multiple images at once, use a batch resizer: add the photos, choose a width or percentage, keep the aspect ratio and export. A few seconds instead of an afternoon in Paint. For more tools, see all media apps for Windows.